hicool@hicoolac.com

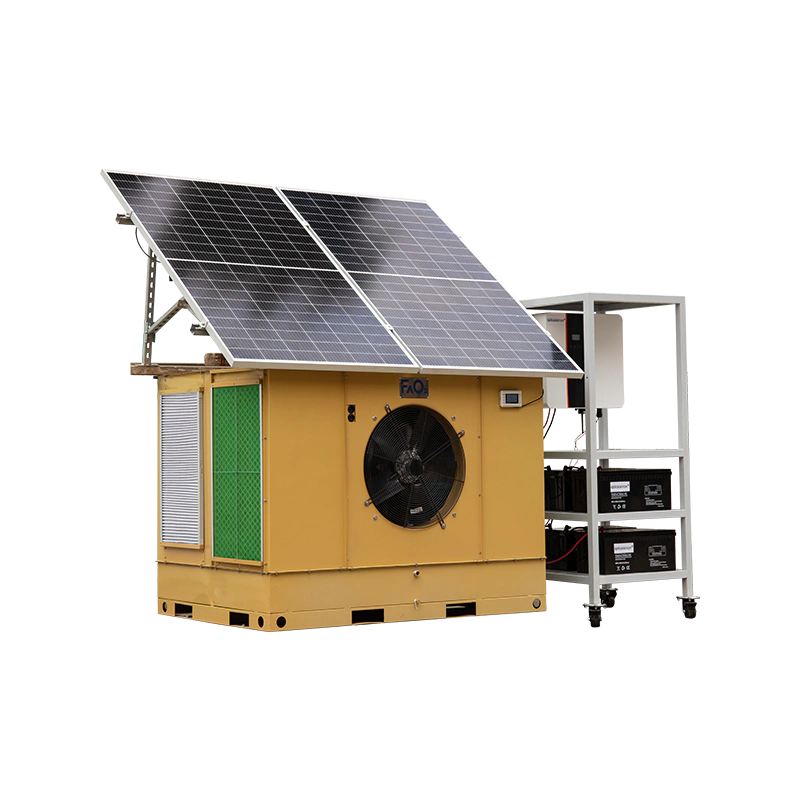
diy baby swampy (small evaporative cooler) - portable swamp cooler air conditioner
by:HICOOL
2019-08-31

For the sake of liquid, the evaporation cooler extracts heat from the air (water)to evaporate.
Baby swamp is the idea that my ability to sweat with regular swamp cooler pads and some household items and tools has been around for a long time.
We can make a small, portable, personal evaporation cooler.
Keep in mind that this will not cool your whole house, or even a room.
When the humidity is very low, the Evap cooler works best in a hot, dry climate.
However, this principle can cool the whole house.
That is, to become creative, the more air you pass through the cooler, the greater the evaporation capacity of the cooler.
I chose this design because it was cheap and simple and it didn't need anything but what I was lying there.
Something you need and something else you don't need I chose to weld and shrink my stuff (
Not a huge fan of a house fire or electric shock accident)
, You can choose the tape or use the docking connector (not shown).
One of the things I don't label on the picture is the power supply, it should be a paragraph of its own. * Power-
I used 9 for this.
The 6 v power I grabbed from the old guitar pedal.
There are others around me, but this one has been used to power a similar fan, so I think it's enough.
The switch would be a good touch, but I can't find a switch that is not used. * Solder Iron -
Need only if you plan to weld and shrink the packaging or tape connection (
Suggested method).
If you don't Weld, make sure you have a strong connection to your docking connector, not anything.
I will not be responsible for electric shock to yourself, your child or your pet.
If you burn the house, I won't.
I may feel sympathy, but I doubt it.
* Swamp cooler liner-
Available from any hardware store, this is to replace my stay in my big swamp cooler, if you can't find it or can't afford it, I might suggest you buy an old one
Shirts, sponges are OK, but I don't think they let much air through them and I think you can think about paper towels.
* Fan, shield and mounting hardware-
The fan is a computer fan of 120mm and is rated at 12 v (I know, I know.
I only have 9 power supplies. 6v)
Please try to use the fan to make your power supply possible.
The computer fans are 12 v.
Almost all household fans are 120 v (
People without experience will not recommend doing so).
* Shrink packaging of electronic tape (
Or Docking connectors)-
You have to isolate these connections from the outside world, or, worse, from each other.
I recommend packing with shrink, but your choice is yours.
If electronic tape is selected, weld the connection and check at least before each use.
If you use a docking connector, tape it in any way, there is a loose way for these things.
I almost stopped using them completely. * Scissors -
Choose something you don't care much about.
The best pair of your sisters, mother or wife will do perfectly; )
To do this, I have chosen some that have sprung up and should probably be thrown away, but they are great for cutting random things and cutting open "Otters" * containers --
This can be almost anything, make sure it has a surface large enough to fit the fan, as shown in the disposable Tupperware type container (
These are crispy).
If using a bigger fan, I would totally recommend using a bucket of five gallons.
* Screwdriver, pliers and wire stripping pliers-
There is no stripping pliers shown here, I don't even use pliers, but if I really need to explain these tools to you, then maybe you shouldn't try this.
* Bit and bit-
At least you should have a fairly large and one in the range of 11/64 (
If a similar fan is used).
If you don't have a drill bit and a drill bit, you can get it with a precise cutting tool and a variety of cones. * Heat gun -
You need this only if you use shrink wrap, hair dryer or lighter.
The gun shown is the one used to remove the paint, but it works wonders on shrink wrap in a few seconds.
Scrap parts from the board is also incredible, if you are a Tinder, it is a very convenient thing in your arsenal, and at Walmart they are quite cheapmart.
* Plate pile, dirty working area (Kitchen counter)-
Completely optional.
If you are married, you may have trouble repairing and mending instead of cleaning, in my case the wife thinks the baby swamp is cute and then lies down and takes a nap.
Exercise your own judgment here.
You want it to be about the size of your fan blade.
I put the fan on the lid and tracked it in with a pen.
I 'd rather use exacto knives for cutting, but as always, half of my tools are right where I left them and I don't know where, so I used scissors.
You might want to give the fan as much as you can because you can see that my hole is not very central, but it turns out that it's a small well, so before I install it, it becomes more centered.
This part is actually one of the more difficult parts of the project.
The fragility of the lid makes it difficult to properly align the holes between the lid, the shroud and the fan.
As you can see, the computer type fan has the direction of air
Flow standard, convenient.
Most fans with the correct polarity push the air outward and you may need to try it out.
You need your fan to breathe in air through the container, which will help keep the pad moist.
I think it will still work in the opposite direction, but my idea is that sucking air up through a container helps bring moisture into the mat.
Free to experiment.
For this step, try to consider the flow of air through your container and how many reservoirs you want.
I chose to make 3 holes on each side in the middle of the depth of the container, all of which are horizontal to each other (give or take).
The purpose of this step is to obtain the maximum airflow without affecting the structure of the container.
As you can see, the bottom of my container changed and I broke the original container while drilling.
You will want to use high speed and try not to force it through.
Dremel would be ideal if you don't use a drill bit, but I think you can use a razor or even a scissors.
Clean these holes as much as you can, which doesn't really affect the outcome of it, but looks better.
The full purpose of the mat or any material you use is to absorb water (
For example, a wet paper towel, which absorbs water through it even if only part of it is immersed in water).
In addition, it needs enough permeability and the air can pass through it.
I have extra swamp cooler padding which seems perfect for this project.
I am not very precise throughout the production process of the mini swamp, and this is not really a required step, it is better to cut the mat a bit larger than you think, and then trim it to fit.
If there is no constant contact with the liner, you absolutely don't want the air to go through the container, which wastes efficiency.
Cut them a little bit bigger, trim off the extra parts, fill the gaps with pieces, and you should be able to go.
Don't try to squeeze the cushion inside, which will limit its airflow, just look for the perfect fit.
Once you have them installed, be sure to test the lid, if it is a low-lying lid, you may need to trim some excess from the mat, on the finished product, I have it, so the mat is barely in contact with the fan cover, and if the pressure is high, you may have a problem with the water pouring into the fan motor, and if the water is too low, you are just wasting air.
Here you will get a little bit of technology.
If a computer fan is used, if a three-pin plug is used, the ground pins are located in the center of the Molex plug, hoping they are colored.
The fan shown cannot work with my 9.
6 v power supply so I have to revert to a known good fan that works with it.
White Stripes on the power cord (Hope)
The negative wire on the power supply will be indicated.
Try your best not to take shortcuts here and the result may be electric shock, damage or fire.
As shown in the figure, I welded the connection and used the shrink package.
Again, I will not take responsibility or even be sad if you call yourself, children, pets or burn your house.
Before you connect the wires, be sure to slide your shrink wrap down and for this I use one on each front and back side and a bigger one on top of them.
Welding is easy enough to make sure you have a good hot joint that you don't want loose.
It doesn't help much to use more solder, but make sure you heat the whole connection so that solder flows through two wires to form a strong connection, which is what you want.
After welding the connections, slide the shrink package onto them and all you have to do is heat it up.
I heated two smaller connections at the same time, and then heated a larger connection on them.
If you do not like to use the power supply, feel free to use the 9 v battery and connector.
This should be enough for most fans. There you go!
Plug in to make sure it works.
Fill your container (
And make sure it doesn't drop everywhere in your house.
Test it out and let me know what you think.
I think this is a fantastic pump-free design that can cool a room or cool the whole area in a larger range!
Custom message